Monday, December 26, 2011

Christmas Cakes Revisited

I have two more cakes to share.  Such a busy time of year!  But I had the privilege of baking two more Happy Birthday Cakes to celebrate the season and here they are:


Vanilla butter cake with buttercream icing, lightly sprinkled with green sanding sugar (You would know, I left the jar of white about 60 miles away :(--     )    with gum paste/fondant leaves.  Oh, and the holly berries are those yummy Sixlets.. love those!

Baked with love for our little church to enjoy after a wonderful children's Christmas program...AND...

 One last time, but for our family Christmas dinner
 I made a coconut cake.
It's my Mom's favorite
as well as a family tradition
BUT....this time I added a surprise

Tinted layers !


All in all we have enjoyed an extremely blessed season, celebrating many times over the birth of our dear Lord.

Now we are looking toward a new year...untouched, unlived.
May everyone who reads enjoy a safe and prosperous 2012!

For those who can, enjoy the remaining 2011 with family and friends.
For they are indeed a gift
From God :)

Friday, December 16, 2011

Happy Birthday Jesus~The Reason to Celebrate

In this day and time of political correctness and short fuses, I believe it is refreshing to just go back to your roots.  My roots are grounded in a traditional American Christmas...you know....the one that's been around for a while.  The one that say unabashedly "Merry Christmas".  The one that celebrates with a tree, lights and Santa.  The one that displays a nativity scene...Yep, that's me.

So it comes as no surprise that our Grandson's Christian Academy Principal would ask my daughter and I to bake a "Happy Birthday Jesus" cake for their refreshment time after the Christmas program.  The SURPRISE was the size.

Will you bake a cake?  Why, sure!  Then later came the details...like "just a pretty cake"  "one that says Happy Birthday Jesus" and "just a double full......"

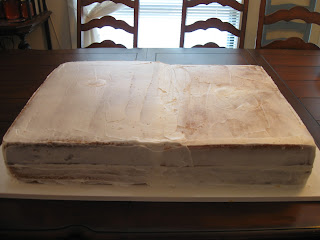
Double Full????  I don't even believe I've even touched a double full sheet cake, but here it is:

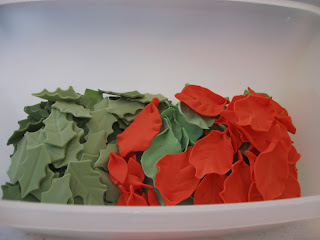
It all started with leaves.....50/50 fondant/gum paste was colored and combined.  Leaves were cut for holly with my mini cookie cutter and then I thought.....I have a bigger fondant cutter that I think would make a good poinsettia leaf.  Veins and detail were added and then they were left to dry.


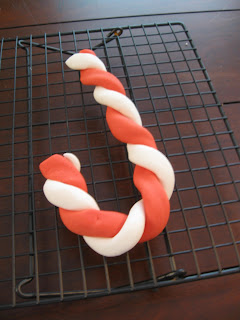
 Next, more fondant was taken out with less than a 50/50 of fondant/gum paste, was tinted pink and then red with Super Red gel by Wilton. The ropes were made and twisted, then left to dry. 

These actually were made first. Red poinsettias from royal icing....days before the baking. Centers are yellow sugar pearls.


Carefully, carefully...mix, prep pan, pour, bake,....bake......bake....did I say bake?

Cool in pan, turn out on rack, cool more and then when it is completely cool, store in the freezer for an hour or two.
This is probably old hat for you guys, but I'm gonna tell you...it was NOT easy to do alone. Lots of time for prayer and conversations with the Lord and after a mistake  several mistakes (learning opportunities)....cakes were stacked, and crumb coated. Do I have enough icing? Why NO. Mix, mix mix mix more and more.


Foam core board...which I FORGOT to wrap in the decorative food paper.  It did work fine, but the covering on the foam core will show "grease" spots.  The icing contributed.  But it was almost unnoticeable.

Don't think this cake can go it alone...so a piece of plywood (covered in a Christmas table cloth) was a MUST!

I really do believe that I baked ALL day! My daughter did come to help and stayed for as long as she could...but only one half-sheet could bake at a time. Each sheet held about 4 - 5 cake recipes....and a total of 45 cackle berries. I'd never heard eggs named by an other name until I came into my husband's family............so "cackle berries" Ha! Ever heard that one?


 It was somewhere about this point that I began to breathe again.
Why is it that the final touches just make the cake?
Flowers that can't be eaten....even though some try.
But I stepped back and began to feel some relief.
Then the transport help arrived and heart palpitations increased again.

And you know what?  In the end, it's just cake folks.
But somehow it doesn't feel like that until it is finished and on display.


Final touches at the fellowship hall and the cake came alive. 

 One minor transporter repair and final piping, attach the rest of the flowers and the "J" 

I look all serious and.....


There...is that better?
I am breathing again.

AND....
I could never have done it without the help of my daughter in the kitchen and as my mental, moral and spiritual support...


My "coach"


Now, we know that Jesus didn't get a piece of His cake, but the whole room sang Happy Birthday and gave Him a little bit of the honor He deserves.

So, Dear Lord I hope you were pleased, with more than a little cake.
I trust our attitudes and lives reflect you SWEET SPIRIT daily, but
this is the reason for all the celebration.
One little child born more than 2000 years ago,
Promised thousands of years before His arrival,
Lived a perfect life (God came to us in human form to experience our trials and pains)
Gave His ultimate sacrifice
Arose
Is coming again for those who put their complete trust in Him.

YES!  Happy Birthday Jesus!!!!!

Saturday, December 10, 2011

Princess cake for a GRAND daughter!

Only happens once a year and the party will be soon.  Our only granddaughter will turn 7 in a few days!  I really just can't believe it!  She is the only girl amidst 3 boys...so the opportunity to make something pretty doesn't come around very often.  But it's here!!! Want a peek?

It's only a peek.  I still have to finish stacking the supporting cakes.  And she hasn't seen it yet, so you must settle for a little peek for now.  I will be following up soon.  Thanks for visiting and HAPPY soon to be BIRTHDAY MIA from Papa and Mimi~

Saturday, December 3, 2011

Happy Birthday to the Baker!

I know everyone is busy this time of year with all those gorgeous Christmas creations....but a few decades ago my husband and I welcomed our first baby girl into the world. And we love her very much. She is the "baker" to Bakersmom and you just can NOT bake your own birthday cake! So this is for you sweet girl. I know you are busy sleeping and getting ready to deliver more precious babies tonight, and I know I said it before BUT this is another chance to say:


Butter cake with milk chocolate (as requested) buttercream filling and frosting...topped with white chocolate swiss meringue buttercream, combo swirls and stars and  finished with a chocolate buttercream rose and three fondant/gum paste rose leaves....  ENJOY!

Thursday, November 24, 2011

Mexican Vanilla Cake with White Chocolate Swiss Meringue Buttercream

Today is Thanksgiving and most of you are in the midst of preparing dinner for our most treasured of American Holidays.  We postponed our celebration for a few days and I am enjoying the calm of the day.  I am thankful for my God, my church, my family, my friends and my co-workers as well as the work I do.

Sometimes people enter our lives almost unnoticed.  We meet, we feel at home with one another and then before you know it, we call them "friend".

It is for such a friend that I baked and decorated this cake....

 Boxed up and ready to go!  An hour drive away!!!!


 A friend celebrated both a birthday and anniversary...BLESSSINGS!!!!


HAPPY THANKSGIVING MY BAKING FREINDS!

Saturday, November 19, 2011

Thankfulness is a Sweet Piece of Cake

Am I a thankful baker?  You betcha!  ...and a Mom and a wife and a....well you get the picture.  I haven't been posting a lot lately.  Perhaps it's because my wonderful husband accepted the pastor position at a little church where we used to be about 11 years ago.  My how time does fly!

Anyway, tomorrow will be the annual Thanksgiving church dinner and I have certainly been a busy bee today prepping for our special day.  Before I go to bed I want to post pictures of my two cakes.  One is for a grandson who will be visiting tomorrow with his Mom and sister.  He has a gluten sensitivity as well as some other ailments and we are experimenting with the whole idea.  Tomorrow's cake is a Betty Crocker Gluten Free with homemade chocolate buttercream and well....let me let you take a peek...

 Betty Crocker has recently developed two Gluten Free cake mixes...chocolate and yellow.  This is the yellow cake mix baked in two 6" pans so that we would have two layers.  I used actually used the Wilton buttercream recipe with cocoa.  The turkey is piped with the large round tip and with a No. 3.  The rest is piped in a circle of leaves and shells using Wilton Golden yellow and orange with a touch of Wilton brown.  The eyes were dotted by just dipping the tip of a toothpick in Black gel and placing the dots on the BC whites.  I actually only tinted a small amount of white BC, placed in a tip and used my finger to make the eyes, beak, beard and legs.  Sure saved a lot of unnecessary icing and bags.


This cake is one 10 inch Regular yellow butter cake covered in the same Wilton chocolate BC and piped with reverse shells.  Alternating yellow, green and orange leaves were added to the top.  The pumpkin candies that are out this time of year were cut in half, attached with a dot of icing and finished with vines and leaves.  I have not piped writing in a while and did use the piping jell to help me out...but think I could do with a few practice sessions.  This cake has gluten as well as butter, sugar and cocoa....no slack here.

Did you know that gluten can be dangerous and even deadly to some people?  Check out this Celiac link to read more about the disease. Click HERE to read more about it. 

So to quickly sum up my week I can honestly say I am thankful for the energy, time and supportive family who have cheered me on to bake and decorate more than 5 dozen Thanksgiving related cookies, make a mother-daughter-nurse cruise to Cozumel, work, visit my Mom, have grandchildren over and cook/back for church tomorrow.  I am truly blessed beyond measure!  So yes, thankfulness is a piece of cake when you realize where all blessings come from....our Heavenly Father!

Sunday, October 30, 2011

But God Loves Spiders....Two Ways!

Well, tomorrow is the last day of October and you know what that means!  I make a habit of bookmarking ideas that I want to try...like this one HERE at Cookies and Cups.  Take a peek. I waited all month for just the right time.  And finally the day came.  

 The first is a 6 inch tall cake and has cocoa-vanilla swirl cake layers, covered in vanilla swiss meringue buttercream with a chocolate spider web. I was excited to make this cake for the children at our church dinner today.   The Oreo spider idea came directly from a great blog.  BUT....


I needed a quick cake for dinner at my daughter's.  So, here is the shorter version covered in regular buttercream, chocolate web but the spiders are mini Reese's PB Cups.  Layers of orange and butter cake layers make the cake.  It was a hit!  It is completely gone.  And that's a good thing.

I can assure you that writing, even with a perma pen on cake rounds is NOT the best idea...it smears....while the ink stayed in tact for our dinners, I noticed that it can transfer to napkins, fingers and the CAKE.  Good thing it didn't do that until I brought the remnants home.  So warning to the wise...wrap the thing and pipe ICING on it.  Learn from my almost disaster.


Monday, October 10, 2011

Little Ghost Girl Topper for One Special Lady

Mom..."So don't you think it's about time to bring another cake?"   Me...."Mom, I'm working on a cute one."  Mom..."Well, I wish you had brought something anyway."  Me..."Yes, Ma mm.  I should have done that!" 

So, here I am telling you about my attempts to make this CUTE cake.  But before you look, maybe you want to see the REAL one at My Cake School.


Okay...here she goes....


 Hint:
When My Cake School says use thicker gauge wire.......Listen.  I had to coax the arms to stay up. Next day?  Bought the right gauge. But guess it's for another cake.   Make balls of Krispy Treats, use cookie sticks dipped in candy melts to secure in "head"  --- that sounds gruesome!  Anyway cover and smooth  wrap said "heads".  And do use a heavy gauge wire -- the lower the number the thicker the wire and mine was not 18---Wrap wire around her body and shape like arms.  Put loop in one end and hang those cute jack-o-lanterns.  (My Cake School gave step by step picture instructions)  But if you didn't go there yet, you just cut off the tops and put a little piping gel to hold some sprinkles.  And don't forget to put little wire loops to make a handle in the pumpkin (wire ends dipped in that melted candy and pushed into pumpkin to secure).  I painted one pumpkin with a face and one without.  But you can't see that in this picture, can you?

 Look........ghost friends.............


And now it's time to roll out that fondant 50-50...very thin....and drape over her.  Trim and fuss a little bit to make her really cute. (Mine kept dropping her arms).  Color a little fondant and form some cute shoes and a little bow....Let all DRY...for maybe even a day or so.  (Tissues were trying to keep up her arms)  I said TRYing...


Bake a cake. Decorate. This is one idea, but there could be so many more. I baked three 3 inch layers and tort-ed/split them. I did mine like a candy corn. I think I'm kind of into that here lately. Top vanilla white, middle orange-orange, and bottom lemon yellow. Tinted butter cream orange to be extension of the middle layer.  Can't wait to cut a slice!   This made enough to make two cakes. Which I need to finish the other one by the way.... Put some cute eyes...I thought about eye lashes....then just caved and copied.  I'm not too much of a risk taker, am I?  But when she is VERY dry, attach her bow and shoes and let dry a bit more.  Then just cut a straw the height of the cake, put her stick body inside and she should be secure :)


 Can you tell at one point I almost dropped the cake?  Drat those cheap boxes....Wouldn't have anything to do with me taking my time.....Icing just doesn't lie....no matter what angle you shoot the pic.


To show you how I think...I forgot to share a picture of the Surprise... the inside of the cake.  I think I have almost had too much candy corn.  But this cake just screamed out "caaaandy coooorn"  And I listened.  It's a real life picture...at the bedside...with tiny bowls...and a Mom having a bit of a problem sitting up....wiping crumbs for the picture didn't exactly cross my mind.  So, I've decided it's just a picture of life...mostly sweet, colorful, full of surprises, leaning on friends and sometimes....when we don't clean up,  a wee bit crummy  crumby.


 Here she is...Mom's BOO-ti-ful gal!


Thank you My Cake School! for the reason for a smile!!!

Sunday, September 18, 2011

Making Scuppernong and Muscadine Jelly

Even though I don't have "baking" pictures to share with you today  (I could have taken pictures of the bread that I made to go WITH the jelly)...but we ate it....before I could think. Which means I have no picture to post.  Oh, well....  Maybe I need to make some more?

Now, I'm getting off track...back to jelly.  Where do you begin?
Scuppernongs!Bronze colored ... a few Muscadines (purple)
Find a REALLY good friend
who planted scuppernongs
and wants to share
and go pick some
like these
or
you could plant your own???
rinse


take out leaves and stems

 place in large pot and just barely cover the grapes with cool water


 bring to a boil and continue boiling until they are somewhat tender
this is a good time to go fold clothes
or load the dishwasher
or just stare at the pot


 take out any daily frustrations with a masher
and just keep breathing in that AWESOME aroma!!!


 cool and then drain in large colander
not too pretty


place in cheesecloth and SQUEEZE
REALLY not pretty


strain juice in a fine strainer at least twice
to remove any seed escapees or skins and pulp


place some type of ascorbic acid like Fruit Fresh to keep the color
(especially if you stop here and are going to make juice to drink or to freeze for jelly making later


have everything ready...this next part goes pretty fast
You will need cleaned, sterilized jars, lids, rings, jar funnel, lifter, sugar, Sure Jell, measuring cup, spoon and dipper


measure juice and  pour in 'Sure Jell' or like product according to package directions for cooked jellies (I followed Concord grapes)
heat to boiling, stir often


 heat lids and keep warm
(yes, these are not your typical lids)
I feel the need to explain...
I buy jars of mixed fruit that come in these CUTE little jars
The fruit gets eaten
The jars get cleaned
And I get to use them again

OKay!  Confession time.  I REALLY use these jars to put my curd in to freeze...cause they are SOoO cute...I forgot to get new lids for my jelly jars.
NOW, that felt better.  These lids have the rubber type rings inside...see?
And they will seal...but if you do this, check and make sure they seal!


 When juice comes to a boil add the pre-measured sugar all at once, stirring constantly and bring back to boil

 reduce heat, cover  and simmer for 10 minutes~


DIRECTIONS Have CHANGED!!
I won't put the old directions on...just so I don't confuse you
andyour jelly doesn't turn out
and you have to pour it on your toast
and that makes you mad.
I want you to be my friend...so just know the boxes have changed.

Well, suffice it to say, I don't know where these "new" boxes of Sure-Jell went; but every box since then has been like the ones I've always used in the past.  Makes me want to go to the land fill and pull out those boxes just to make sure I am not going insANE....pROMISE....i AM ABsolutely normal!
At any rate

This is a lesson
ALWAYS READ the Directions on the box
for times and amounts! 
But I really did like the "new" one.
And if I ever find it again, I will let you know!

I will tell you that the "old" type says cook one minute and FOR ME that is never enough...It has to jell slightly when dripping off the spoon.

SIGH...Ok I've been meaning to edit this and NOW it's done.
I hope I have not led too many astray.


Now back to directions.....
remove from heat, ladle into jars, add lids (or lids and rings)
use firm-tight, but don't exert extreme pressure
leave to cool undisturbed until the lids make a popping noise and seal.


phew!  I think it took longer to post than to actually make...

JELLY!

(I just love the color the muscadines added to the normally champagne color of scuppernong jelly)

Tuesday, September 6, 2011

Guy Cake

Birthday cakes produce mental pictures of delicate roses and soothing pastels on pristine white icing with swirls...........NOT. Not today!    Guy...roses, swirls, pastels--just not seeing it.  Well, maybe a few swirls.

I asked my husband (the man who lets me play with food and doesn't bat an eye when the icing takes over the fridge) what kind of cake he wanted for his birthday.  I think I meant, white, yellow, chocolate....I'm not exactly sure, because then I followed up with "pick anything you want".  And...

HE DID!  Italian Cream....

Now Italian Cream is a good cake.  Moist and very tasty.  But I was thinking of using my newly found love for decorating...I really don't know what I was thinking.  I mean I've already made him a chocolate cake with chocolate buttercream roses, beautiful shells and...maybe you may have seen a previous post of mine at about the time I finished my Wilton Classes.  He was SO complimentary of his "delicate" cake.   What can I make with Italian cream? It's bumpy!   I haven't taken class III yet.  Fondant?  wha?  No to self.  Not yet.  But I did come up with an idea.  Take a look.....


 He was an All-American back in the day...
~

Uh huh, I'm thinking football, aren't you?


Cut a wedge of yellow cake and make a partial stadium.  Buttercream!  Yes!
And somewhere, one of the fantabulous bloggers I follow posted a a picture of a "crowd" with sprinkles.  All right!  I have sprinkles!


 Field, field?   I know!   Tinted coconut...and that's a main ingredient in IC cake.  OKAY!  On a roll!!!!  And we need yard markers---royal icing and food pens.  Sure!  Royal icing on floral wire...will that work?  It did!  Age.....I got it...those yards to go markers on TV!  And of course Happy Birthday on top of the stadium.  Phew! 


The Happy Birthday Boy!
and
GoOoOo Dawgs!

Sunday, September 4, 2011

My Little Tarts

This is not a how-to but rather a "share".  I still can't believe that adding just a bit of lard can make such a difference with crust...but it REALLY can.  Try it and see.  I substituted 1/2 of the shortening called for with lard.  I'm telling you...REALLY GREAT STUFF!

Here's the pictures of our desert tonight!


Lime Tarts!

with real whipped cream...mmmm!


Check out this recipe for crusts like mine at COOKS.  EXCEPT...hint... remember I half the fat with Crisco and lard....yes, my friend...L..A..R..D.  Try it and see.